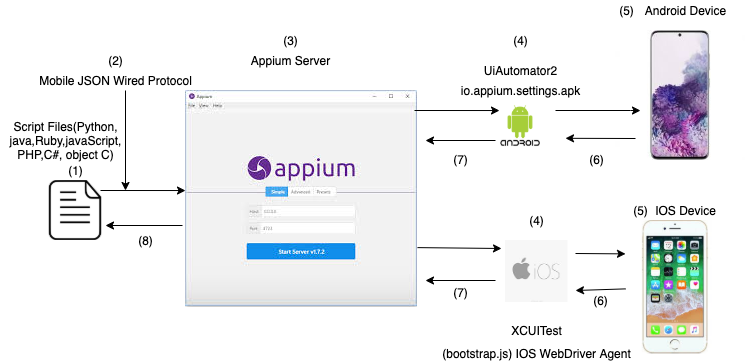

Below is the Appium Architecture flow diagram. Let us see step by step wise how it performs.

Appium consists of mainly below four stages to function.
Appium client libraries such as python,Java, Java script , C# and Ruby etc. Whenever we start executing the test scripts in respective languages our test code will be converted to JSON format in the form of keys and values pairs.
JSON stands for JavaScript Object Notation.JSON helps to transfer data between client to server and vice versa by HTTP protocol.
Now the converted JSON code by client libraries will then be transferred to Appium server over HTTP protocol.
Appium Server is created on top of Node.js, Appium server it will validate the device details such as Platform type (Android or IOS or Windows ) , Platform version, Automation name , App details etc and it will act according to the given details on respective device.
Now this appium server communicates with the UiAutomator 2(for Android) or Bootstrap.js (for IOS) to perform the action which are mentioned in the code on the device.
Android : UiAutomator 2 processes requests from Appium server to device by using io.appium.setting.apk which is installed in the device while executing the code and this app is used to execute the command which receives from the appium server.
IOS : Bootstrap.js process request from Appium server to device and execute the command.
Now test results will communicate back to the appium server and finally it will display results on the system by using Mobile JSON wire protocol.
UiAutomator : UiAutomator is an inbuilt UI test framework of Android. The latest version is UiAutomator 2.0.
XCUI Test: XCUITest is XCode's IOS framework which is used for unit and UI tests on IOS Apps.
WinAppDriver : Appium is used to automate windows pc desktop apps by using WinAppDriver.
Appium uses these three frameworks of Android , IOS , Windows and created a common methods by wrapping on those frameworks.